How to Record Screen with Sound on Mac
Screen and sound recording are essential tools for Mac users. Whether you’re a content creator, software tester, educator, or just a casual user, knowing how to capture your screen can be immensely helpful.
And while many third-party apps can do this, macOS already comes with robust built-in tools that can handle both tasks elegantly. Here’s a detailed guide on how to use these tools to record your screen and sound on your Mac.
Screen Record with Sound Using Screenshot Toolbar
Apple has made it simple to record your screen with the Screenshot Toolbar. Here’s how:
- Press Shift + Command + 5 on your keyboard to bring up the Screenshot Toolbar.
- At the bottom of the screen, you’ll see several icons. To record the entire screen, click on the “Record Entire Screen” button (it’s the second button from the right). If you want to record only a portion of the screen, select the “Record Selected Portion” button, and you can drag to select the part of the screen you wish to record.
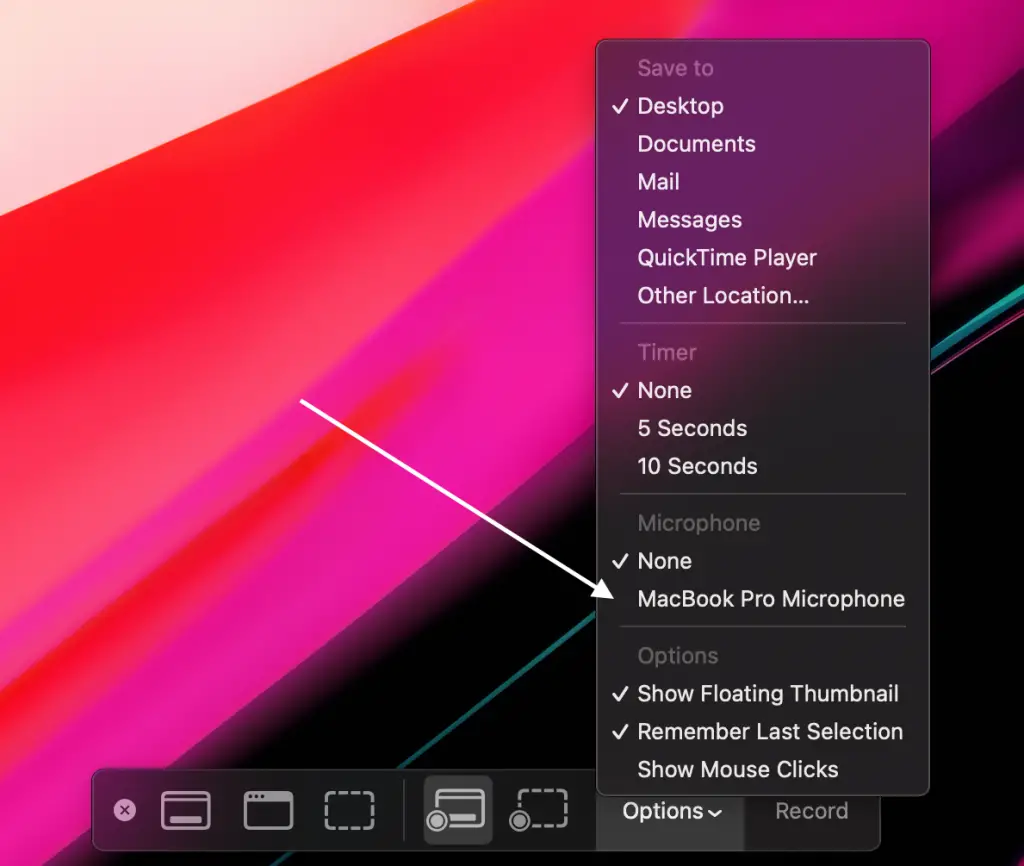
- Click on “Options” in the toolbar and from the “microphone” section choose your microphone to record sound.
- Click on “Record” to start recording. Once you’re done, click the “Stop” button in the menu bar, or press Command + Control + Esc.
Record Screen and Audio with Third-Party Applications
While macOS’s built-in tools are quite robust, you might find third-party applications useful if you need more advanced features. Apps like OBS Studio, Camtasia, and ScreenFlow offer more control over video quality, audio sources, and come with built-in video editing tools.
Before choosing an application, consider what features you need. If you’re creating professional video tutorials, investing in a full-featured application like Camtasia might be worthwhile. If you need to stream live video, OBS Studio is a popular free and open-source choice.
Practical Applications of Screen and Sound Recording
Screen and sound recording on your Mac can be used for various practical applications. For example:
- Creating Tutorials: You can record step-by-step instructions to teach someone how to use software or navigate a complex process.
- Software Debugging: If you encounter a software bug or error, recording the screen can help developers understand the issue.
- Live Streaming: With screen recording and audio capture, you can live stream your screen for webinars, live tutorials, or gaming sessions.
- Recording Video Calls: With the participants’ permission, you can record video calls or meetings for future reference.
Understanding how to record your screen and sound on a Mac can increase your productivity and broaden the ways you use your computer. Whether you’re teaching, presenting, gaming, or troubleshooting, these recording features are powerful tools to have at your disposal. And best of all, these capabilities are built right into your macOS, readily available when you need them.