How to Reduce PDF File Size on Mac: A Comprehensive Guide
Dealing with bulky PDF files on your Mac can be a tedious affair, especially when trying to share or store these large files. The good news is, macOS comes with several built-in tools and functionalities to help you compress and reduce your PDF file sizes without compromising on quality.
This blog post will take you through three key methods – using the Preview app, using third-party applications like Adobe Acrobat Pro, and online compression tools. Let’s delve in.
Using Preview App
The Preview app, pre-installed on your Mac, can be used to compress PDFs directly.
Step 1: Open PDF with Preview
Locate your target PDF file and open it with the Preview app. If it doesn’t open by default, right-click on the file, select ‘Open With’, and choose ‘Preview’.
Step 2: Export with Reduced File Size
Go to ‘File’ on the top menu, and click ‘Export’. In the dialog box that appears, click on the ‘Quartz Filter’ dropdown and select ‘Reduce File Size’.
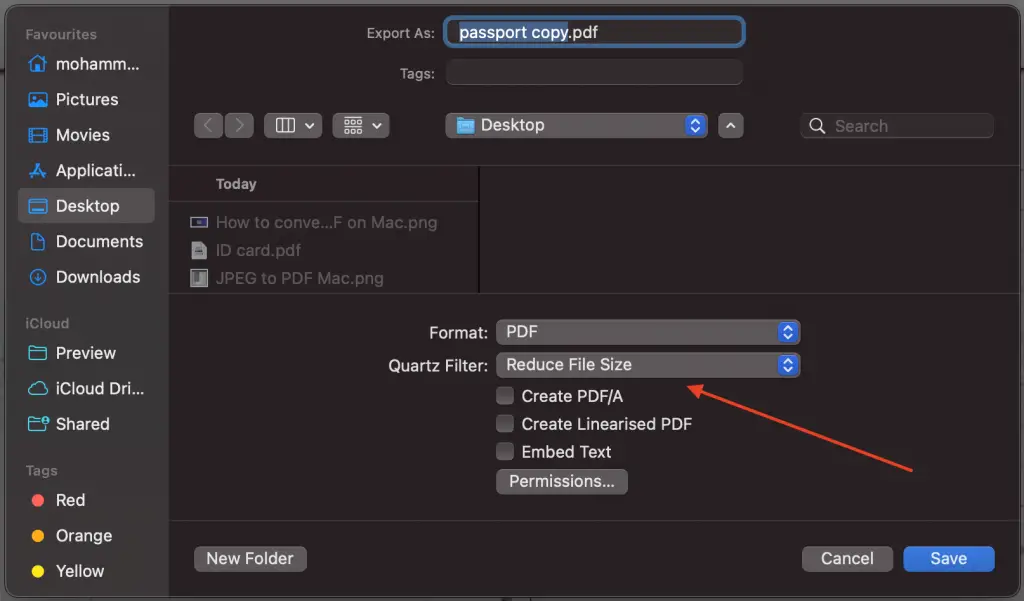
Step 3: Save the Compressed PDF
Enter a name for your compressed PDF, choose a location to save it, and click ‘Save’. You’ve now compressed your PDF using the Preview app!
Note: The ‘Reduce File Size’ filter can significantly reduce the file size but may also substantially decrease the quality of images and graphics. Always check the quality of the compressed PDF and consider making a backup of the original file.
Using Adobe Acrobat Pro
Adobe Acrobat Pro is a powerful third-party software that offers advanced compression settings.
Step 1: Open PDF with Adobe Acrobat Pro
Launch Adobe Acrobat Pro and open your PDF file.
Step 2: Optimize the PDF
Go to ‘File’ > ‘Save As Other’ > ‘Reduced Size PDF’ or ‘Optimized PDF’. The latter gives you more control over the compression settings. You can modify settings for images, fonts, transparency, etc., allowing you to balance quality with file size.
Step 3: Save the Compressed PDF
Choose a location, name your file, and click ‘Save’.
Note: Adobe Acrobat Pro is a premium product, but it does offer a free trial if you only need to use it temporarily.
Using Online Compression Tools
If you’d prefer to use an online tool, there are many options like SmallPDF, iLovePDF, or Adobe’s online compression tool. These tools are generally user-friendly and can reduce file sizes effectively.
Step 1: Upload the PDF
Navigate to your chosen online compression tool in your web browser and upload your PDF file.
Step 2: Compress the PDF
Click the ‘compress’ or similar button. The tool will process your PDF and reduce its file size.
Step 3: Download the Compressed PDF
Once the compression is done, download your compressed PDF back onto your Mac.
Remember to be cautious while using online tools due to privacy concerns, as your files are being uploaded to a third-party server.
The macOS environment offers multiple avenues to reduce the size of your PDF files. Whether you use the Preview app, ColorSync Utility, Adobe Acrobat Pro, or an online compression tool, there’s a method that will meet your needs.
Now, sending, sharing, or storing your PDF files should be a breeze, no matter how data-heavy they initially were. Familiarizing yourself with these methods is a great way to enhance your PDF handling capabilities on your Mac.