How to Apply Strikethrough Text in TextEdit on Mac
Among the many features of your Mac’s native TextEdit application, the ability to apply a strikethrough to your text is a tool that is both practical and easy to use.
Whether you’re making edits to your work, noting completed tasks on a to-do list, or simply adding a bit of visual interest to your writing, the strikethrough feature in TextEdit is a great option.
In this blog post, we’ll guide you through the correct steps on how to use it.
What is Strikethrough?
Strikethrough is a typographical presentation of words with a horizontal line through the center of them. It represents an editing mark to show deletion or a creative style to make a certain point.
It’s often used in various forms of writing, and can be particularly useful in digital formats where physical erasure isn’t an option.
How to Apply Strikethrough in TextEdit
Applying strikethrough in TextEdit involves some specific steps. Here’s how to do it:
- Open TextEdit: Start by opening the TextEdit application. You can do this by clicking on the TextEdit icon in your Dock, or by finding it in your Applications folder.
- Create or Open a Document: Next, either create a new document or open an existing one. You can create a new document by going to File > New, or open an existing one by choosing File > Open.
- Ensure Rich Text Mode: While in the TextEdit app, make sure you are in rich text mode. To do this, click on Menu > Format. If you see Make Plain Text listed, it means you are already in rich text mode. If you see Make Rich Text click it to switch to rich text mode.
- Highlight Your Text: Now, select the text to which you want to apply strikethrough. Do this by clicking and dragging your cursor over the desired text.
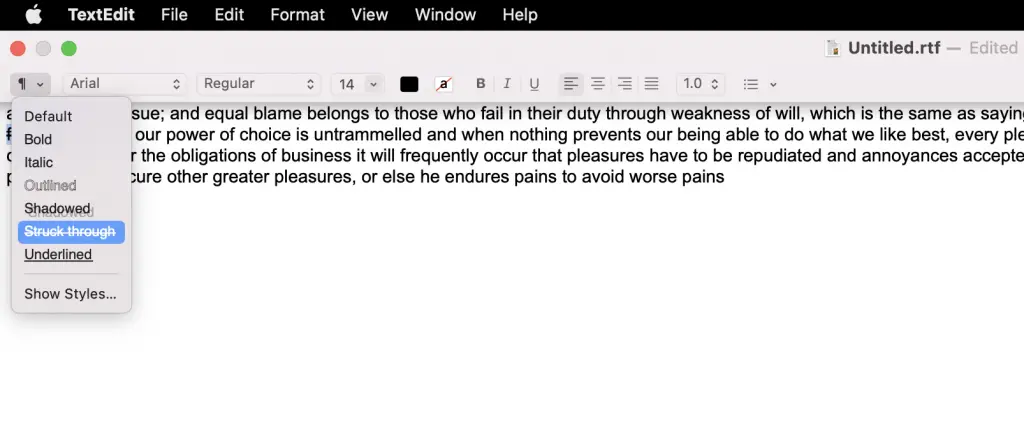
- Apply Strikethrough: Once your text is highlighted, look for the small icon under the close button on the window. Click on this icon, and from the drop-down menu that appears, select Strikethrough or Struck through. Your selected text will now have a line running through its center.
Removing Strikethrough
If you decide you want to remove the strikethrough from your text, the process is just as simple. Follow the same steps as above, but when you get to the strikethrough option in the drop-down menu, click the Default option. This will remove the strikethrough from your selected text.
Additional Styling Options
In addition to strikethrough, TextEdit offers a number of other text styling options. These include bold, italics, underline, outline, and shadow, among others. You can find these options in the same drop-down menu where the strikethrough option is located.
Whether you’re using it for practical or stylistic reasons, knowing how to apply and remove strikethrough in TextEdit is a valuable skill. With these simple steps, you can make your work in TextEdit more flexible, dynamic, and catered to your specific needs.