Convert JPEG to PDF on Mac: An Easy How-To Guide
Imagine having a pile of JPEG images on your Mac that you need to convert to PDF format. Whether it’s a set of family photos, a collection of business documents, or a series of design drafts, macOS offers several methods for this conversion that are easy and free to use.
Let’s dive into understanding the steps of these methods and how to effectively use them.
Using Preview
The simplest and most commonly used tool for this purpose is the built-in ‘Preview’ app.
Step 1: Open the JPEG File with Preview
To start, locate the JPEG file that you want to convert on your Mac. Once you find the file, double-click it, and it should open in Preview by default. If not, right-click on the image, select ‘Open With’, and then choose ‘Preview’.
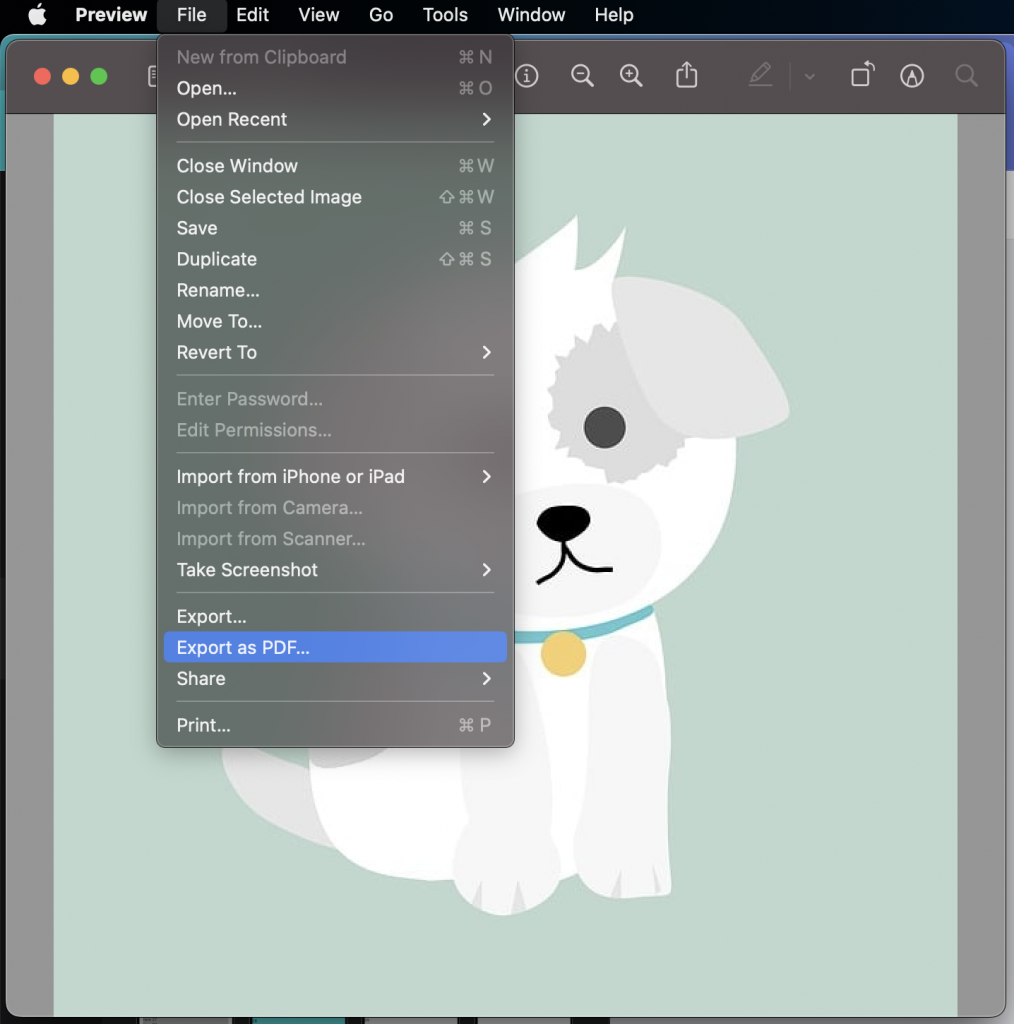
Step 2: Convert JPEG to PDF
After the image is opened in Preview, navigate to the menu bar at the top of the screen. Click on ‘File’, then select ‘Export as PDF’. A new window will pop up.
Step 3: Save the PDF
In the pop-up window, choose the location where you want to save the new PDF file. Enter the desired name of the file in the ‘Save As’ field and click ‘Save’.
And voila! Your JPEG image is now converted to a PDF.
Using Free Softwares Like GIMP
The GNU Image Manipulation Program, more commonly known as GIMP, is a powerful, open-source graphic editor that you can use to convert your JPEG images to PDF.
Step 1: Install GIMP
If you don’t already have GIMP installed, you can download it from the official website for free. Once downloaded, follow the on-screen instructions to install it on your Mac.
Step 2: Open Your JPEG in GIMP
Launch GIMP, then go to ‘File’ > ‘Open’ and select your JPEG image. The image will now open in a new GIMP window.
Step 3: Convert JPEG to PDF
Once the image is opened, go to ‘File’ > ‘Export As’. In the dialog box that pops up, you can specify the location and name for your new PDF. Ensure to end the filename with ‘.pdf’. Click ‘Export’ to continue.

Step 4: Adjust PDF Settings
A new window will appear with several settings for the PDF. You can choose whether to apply compression or whether to include the layers of the image. Once you’ve selected your desired settings, click ‘Export’.
You have now converted your JPEG to a PDF using GIMP!
Using Online Tools
While the built-in macOS tools and free software like GIMP are efficient, some users may prefer using online tools for JPEG to PDF conversions, like SmallPDF or iLovePDF. These tools offer user-friendly interfaces and additional features like compression, orientation adjustments, or page size selection.
Step 1: Upload the JPEG file
Open the online tool in your web browser, then select and upload the JPEG file from your Mac.
Step 2: Convert and Download
After uploading, click ‘convert’, and within moments, your JPEG will be converted to a PDF. Download the new PDF file to your Mac, and you’re done!
However, always remember that when using online tools, be wary of privacy considerations as you are uploading your files to a third-party server.
In conclusion, whether you opt for Preview, GIMP, or an online converter, macOS offers a variety of ways to convert your JPEGs to PDFs easily and efficiently. These are indeed among the easiest and most convenient methods.
Converting files has never been simpler, thanks to these powerful and user-friendly options available right at your fingertips on your Mac!